In January, I talked about how you can use Gmail’s labels option to help clean up your inbox. Today I wanted to take it a step further and share how filters can make your life 5,000 times easier.
Filters
Though I love labels, the filters feature may be my favorite part of Gmail. Why? With filters, I can have all of the emails for my blog sent directly to my blog folder or the appropriate subfolder. A lot of people might not like this because the emails won’t appear in your inbox, but I love this part! It allows me to keep all of my blog related stuff in one area and I can move them to my inbox if I need to. This has made it so much easier to keep emails from overcrowding my inbox or get lost in the shuffle.
There are a million different ways you can set up your filters, so I really suggest playing around with them until you find the ones that work perfect for you.
Blog Emails Straight to Your Blog Label
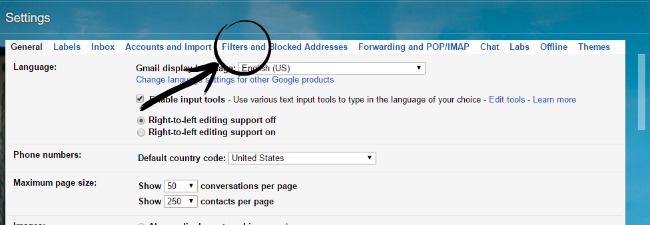
1. Head over to settings and then select the “Filters and Blocked Addresses” tab. If you’ve never made a filter this folder will be empty! If it’s not, just scroll to the bottom and click “Create a New Filter.”
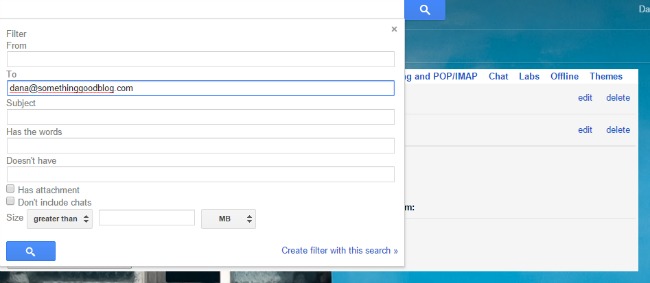
2. The easiest step is to filter by the “To” section of your email. Here, I put my email address into the text box for “To.” Then, click on “Create Filter with this search.”
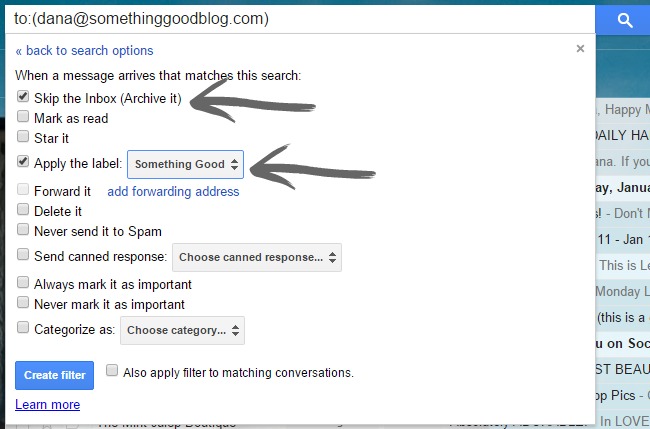
3. Check the boxes for: “Skip the Inbox” and “Apply the label: “Blog Label.” Then hit create filter. Once I’ve done this, all of the emails sent to my blog email address will be moved directly into my “Something Good” folder. Also, they’ll be kept as unread so I don’t miss them.
Filter Directly Into Folders
I use this for the specific programs that I work with. A lot of these programs send out emails and I want to make sure that I always have them in one place. For this example, I’ll use Mode (who I use for sponsored posts and advertising).
1. Head over to settings and then select the “Filters and Blocked Addresses” tab. If you’ve never made a filter this folder will be empty! If it’s not, just scroll to the bottom and click “Create a New Filter.”
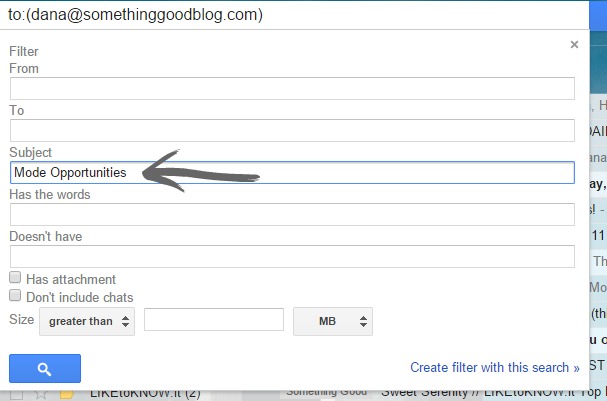
2. Since I know that the emails from Mode have similar subject lines, I enter “Mode Opportunities” into the text box for “Subject.” Then, click on “Create Filter with this search.”
3. Check the boxes for: “Skip the Inbox” and “Apply the label:” “Mode” Then hit create filter. Once I’ve done this, all of the emails that have the subject line “Mode Opportunities” will be sent directly to that folder.
The best part about Filters is that gmail lets you play with them first to see if they’re actually tagging the correct emails. When you’re in the first part of creating your filter, you can hit the search button and see what emails are pulled. If gmail isn’t pulling the right emails, then you have the opportunity to go back and fix it!
Phew! That was a doozey of a tutorial. I hope this helps in making your inbox a more organized place!





Comments
Comments are closed